Tuesday, May 31, 2011

CHICKEN BURGER WITH A DRIZZLE OF HONEY

This was supposed to be the best chicken burger ever! Homemade bun, crisp lettuce, fresh tomato, red onion, fiery pepper jack cheese, mayo... and then I ruined the chicken. Well not totally ruined, but it was over cooked. Why? Because I'm lazy, and I didn't pound it thin like the recipe instructed me to.


But I still want to share the recipe for the chicken, because, when properly made, it's awesome. So juicy, flavorful, and then you top it with a drizzle of honey, that, with all the other flavors going on, just make that burger oh so special.

I don't fry often, especially with my kids around, because I'm so scared of what can happen, so it's even more frustrating that one of the few times that I do fry something, I ruin it. I mean, it wasn't totally ruined, we ate it and it was okay, but we all knew how good it could have been. At least the bun made up for the chicken fail. This homemade burger bun is to-die-for. Check out my baking blog for the recipe. Even the asparagus was perfectly cooked! Love asparagus this time of year.

honey kissed fried chicken sandwich
recipe adapted from life's ambrosia

4 boneless, skinless chicken breasts, rinsed and pat dry
3/4 cup buttermilk
1 egg
1 tablespoon plus 1 1/4 teaspoon seasoning salt
1/2 teaspoon Tabasco
1 cup all-purpose flour
1/2 teaspoon baking powder
oil for frying
4 homemade buns
mayonnaise
honey
tomato slices
lettuce leaves
sliced red onion

Place chicken breasts in a resealable plastic bag. Pound with the flat side of meat mallet until flattened to 1/4 inch thick (a rolling pin would work too).
In a bowl whisk together buttermilk, egg, 1 1/4 teaspoon seasoning salt and Tabasco. Transfer to resealable plastic bag, and add chicken. Shake bag to that the chicken is fully coated with the marinade. Remove all the air from the bag, seal and refrigerate for at least 2 hours.
After marinating the chicken, place flour, baking powder and 1 tablespoon of seasoning salt in a resealable plastic bag. Remove chicken from marinade and transfer to flour. Shake to coat. Allow to sit for 15 minutes.

Heat 1/ 2 inch of oil in a skillet over medium heat. Once the oil starts to shimmer, sprinkle a little flour over it. If it sizzles its ready. Fry chicken until golden brown and cooked through, about 3-4 minutes per side. Transfer to a paper towel lined plate and set aside.

Split buns. Spread mayonnaise on buns. Place chicken breast on bottom half of roll, drizzle 1 teaspoon of honey over each chicken breast. Add tomato, lettuce, onion and top half of roll.


Do not, I mean DO NOT leave out the honey. I swear, it takes this burger to a whole other place! So yummy!

Monday, May 30, 2011

SUN DRIED TOMATO CARBONARA WAFFLE PIZZA

I was reading this post where the blogger has a feature called magazine mondays, where on mondays, she rounds up recipes that her readers have submitted that came from magazines. I thought this was a brilliant idea, as I get a few food magazines, but rarely make anything out of them. So I picked up one of the food magazines lying around, found a few pages that I had dog-eared, and promptly forgotten about, and decided I was going to put these magazines to good use and make these recipes.


So I did. Well not really, since the recipe I made was inspired by a picture in a magazine, but wasn't featured in a magazine. Anyways! I saw this picture of a "pizza" with a savory waffle as the crust instead of regular dough. I'm always looking for any excuse to use my waffle maker, so decided this would be lunch. My waffle maker came with a booklet of yummy sounding recipes, so I decided to use the sun dried tomato carbonara waffle as a base for our lunch.

sun-dried tomato carbonara waffle pizza
recipe adapted from Kitchen Aid waffle baker instructions and recipe

2 cups all purpose flour
2/3 shredded parmesan cheese
2 tsp sugar
1 tbsp baking powder
1 tbsp basil
1 tsp garlic seasoning
1/4 tsp salt
1/4 tsp black pepper

1 2/3 cups milk
2 eggs
1/3 cup olive oil

handful of chopped, cooked bacon
2 tsp sundried tomato pesto

Combine dry ingredients together in a large bowl and set aside. Whisk wet ingredients in a small bowl, and pour into the the dry ingredients. Mix until just moistened. Stir the bacon and sun-dried tomatoes.

Scoop 1 cup of the mixture onto the preheated waffle iron, and cook for 3 minutes 45 seconds.


I topped our waffles with bottled pizza sauce, chopped up pepperoni and pizza blend shredded cheese before popping it in the toaster oven to melt the cheese. I had a bunch of veggies out to add to this pizza, but this was a particularly hectic lunch, so they were quickly forgotten and only toppings requiring minimal prep were used. Good enough. I guess a nice salad would have rounded out this lunch. Next time!

We're really starting to enjoy savory waffles around here. They are quick and easy to make, usually requiring ingredients that I have on hand, and they are super tasty!

Saturday, May 28, 2011

FOUGASSE AND ROASTED GARLIC, BACON AND ONION RELISH

A little while back, I made bacon jam. Highly enjoyable when freshly made, very bad for you, awesome on fresh bread. So when I saw this recipe for roasted garlic, bacon and onion marmalade floating around, I decided to see how it compared. It has similar components: bacon, onions, garlic, vinegar, but the focus on this one, is definitely more on the garlic and onions than on the bacon, although the bacon does add a nice salty smoky flavor.


The only thing is, I refuse to call it marmalade. It just doesn't provide the right picture in my head. Debating between jam and relish.... going for... relish.

Roasted Garlic, Bacon and Onion Relish
recipe source: hungry foodies pharmacy

2 heads of garlic
3 slices bacon
1 tablespoon extra virgin olive oil
3 large yellow onions, sliced
1/3 cup water
2 tablespoons balsamic vinegar
1 heaping tablespoon brown sugar
1 tablespoon thyme, chopped
Salt and pepper, to taste

Preheat oven to 400 degrees F.

Cut off 1/4 to 1/2 inch of the top of the garlic bulbs using a knife, leaving the tops of the individual garlic cloves exposed. Place garlic bulb on top of a sheet of aluminum foil large enough to wrap the whole garlic bulb. Drizzle with two teaspoons of olive oil, sprinkle with a little salt, and wrap foil tightly. Bake for about 30-35 minutes, or until the feel soft when pressed.

Allow the garlic to cool enough so you can touch it without burning yourself. Use a fork or your fingers to pull or squeeze the roasted garlic cloves out of their skins. For large roasted garlic cloves, chop coarsely.

In a large, nonstick skillet, heat extra virgin olive oil over medium heat. Add the bacon slices and cook until the fat has been rendered, and the bacon is crispy. Remove bacon and place onto a paper towel-lined plate. Once cool to handle, crumble the bacon into coarse crumbles.

In the same skillet with the bacon fat, add the onions and saute until the onions are tender, about 15 minutes. Reduce the heat to just medium to medium-low, add water, cover with a lid and cook until the onions turn an amber golden brown. You will need to stir occasionally, until done, about 45 minutes.

Add the crumbled bacon, balsamic vinegar, brown sugar, thyme, roasted garlic cloves, salt and pepper, and deglaze the pan and cook until most of the moisture is gone. Once cooled, pour into a container and keep refrigerated. Will keep for about 5 days.

Makes 1 1/2 cups.


It's a savory spread for sure, with a hit of sweet. Good flavor. The only thing about it, you kinda have to serve it fresh, because if it sits, even at room temperature, it kinda congeals, and looks unappetizing. (Not that it's a beautiful condiment to start with...) I mean, it's made with bacon. That's what bacon fat does, right? Serve it fresh. If you make it ahead of time, try reheating it before serving it. 

To eat with this relish, I really wanted to make these cheesy potato sticks, but I just couldn't find the flour called for in the recipe. I was going to try to find another recipe for potato bread sticks, but when I picked up an issue of Ricardo so I could read it before giving it back to my mom, I saw the fougasse and knew that it was going to be a winner. I say read, but I really didn't. Ricardo is a nice magazine and all, but the articles are super specific and super long. I mean, six pages devoted to radishes? Really? So I skimmed it. And the fougasse! 


It's basically just pizza dough, shaped like, well, a fougasse, and topped with aromatics and oil.

Fougasse
recipe adapted from Ricardo

1 1/4 cups warm water
1 tbsp olive oil
1 tbsp honey
2 3/4 cups all purpose unbleached flour
2 tsp instant yeast
1/2 tsp salt

3 tbsp olive oil
2 tsp fresh thyme
freshly cracked black pepper
fleur de sel

In a glass measuring cup, combine the water, oil and honey. Set aside. In the bowl of a stand mixer, combine the flour, yeast and salt. Add the wet ingredients and using the bread hook, mix until the dough comes together. Let the stand mixer do its thing for 3 minutes.

Shape the dough into a ball, and put it in a clean, lightly oiled bowl covered with a damp tea towel to let rise in a warm spot  for about 1 hour, until doubled in size.

In a small bowl, mix the oil with the herbs and season with salt and pepper.

If you have a pizza stone, set it on the lowest rack of your oven. Heat the oven to 475.

When the dough had double, divide it in two portions and stretch it into a rough circle on a piece of parchment. Using kitchen shears, cut 6 holes in the dough and stretch it out slightly. Brush the dough with oil and sprinkle with fleur de sel. Bake for 15 minutes until golden.


This was wonderful bread! I'm used to making the no knead artisan bread in 5 minutes a day bread, but this isn't much more work, and I like that you can use it after only an hour. It was fluffy, and chewy in a good way, and very flavorful. 

I was a bit worried because the dough seemed really wet, but I let it rise anyway. I only had 3/4 tsp instant/quick yeast, so I used traditional yeast as well without ill effects. It rose up fine, and was easy to shape. Fougasse is pretty forgiving anyway. It's meant to look rustic.

Oh and the original recipe calls for rosemary instead of thyme and a minced garlic clove in the oil. I guess any combination can work! 

My husband declared that this was the best pizza dough yet, and that he expects pizza more often since the dough is so easy to make. Guess I'll have to oblige!

Wednesday, May 25, 2011

EGG ROLLS, SCALLION NOODLES AND SPARERIBS

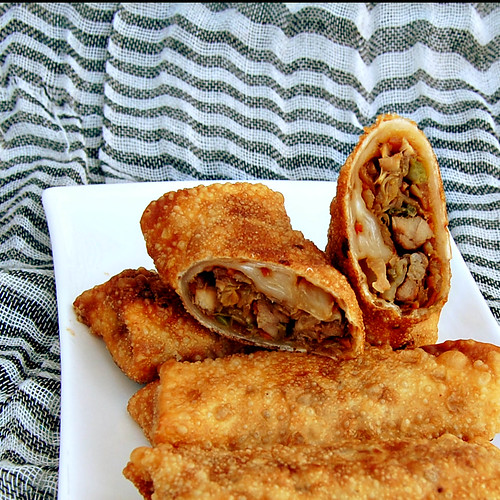
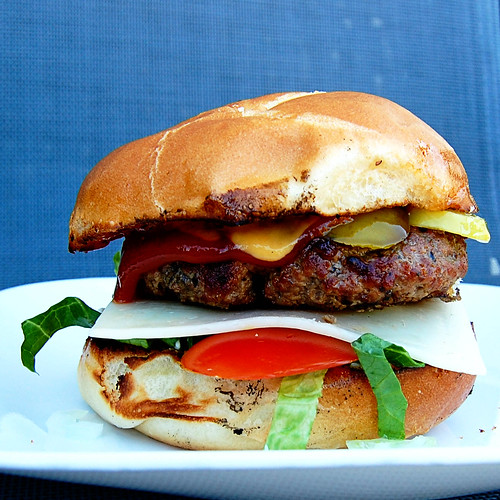
A couple of egg roll pictures floating on the web caught my eye recently, and I knew I just had to make some. Our local chinese take out makes a pretty mean egg roll, but nothing like these pictures I saw. They looked so much... healthier. I know egg rolls aren't healthy, but hey, they're stuffed with veggies. It's all good!

I combined the recipe from annie's eats and the one from a sweet chef, used what I had in the fridge, and came up with this:


egg rolls

1 lb. boneless, skinless chicken thighs, cut into strips
2 tbsp soy sauce
2 cloves minced garlic
1 tsp black pepper
1/2 tsp chopped ginger
4 tbsp. vegetable oil, divided

¾ head green cabbage, shredded thin
1 small onion
3 carrots, peeled and shredded
3 stalks celery
3/4 cup frozen peas
4 chopped green onions
1 tbsp soy sauce
1 tbsp dark soy sauce
2 tsp sweet soy sauce

24-30 egg roll wrappers
1 egg
Canola or peanut oil, for frying

In a resealable plastic bag, combine chicken, soy sauce, garlic, black pepper and ginger. Press out the air, seal, and let marinate in the fridge for 30 minutes, up to 3 hours.

Add 2 tbsp oil to a large skillet or wok and cook chicken over medium-high heat until cooked through. Remove from pan and set aside. When cool enough to handle, chop chicken in small pieces.

If needed, add more oil to the pan, and cook cabbage, onion, carrot and peas until tender, about 5-8 minutes. Add green onion, soy sauce and stir to incorporate. Cook 2 minutes. Add the cooked chicken and stir again to incorporate well. Cook an additional 5 minutes. Place the mixture in a colander, pressing down to remove as much liquid as possible. Let cool for 30 minutes before assembling egg rolls.

On a clean, flat surface, place 1 egg roll wrapper with 1 corner facing you. Place approximately 1-2 tablespoons of the filling about 1 inches from the bottom corner of the wrapper. Fold the bottom corner over the filling.

Firmly roll the filled wrapper half-way up the rest of the wrapper. Dab the exposed edges of the wrapper with a beaten egg. Fold the two sides over the filled roll and roll the rest of the way up, pressing the top corner firmly onto the egg roll to seal it.

Repeat for the rest of the wrappers. Once ready to cook, heat about 3/4-inch to 1-inch of vegetable or canola oil over medium-high heat in a large skillet or wok. Once oil is hot (you will know it’s ready when you dip the end of a wooden spoon in it and bubbles form around it right away), carefully place enough egg rolls to cover the bottom of the pan. Try not to crowd them. Fry until golden brown on both sides, about 1-2 minutes per side. Once golden brown on both sides, remove and drain on a plate lined with paper towel.


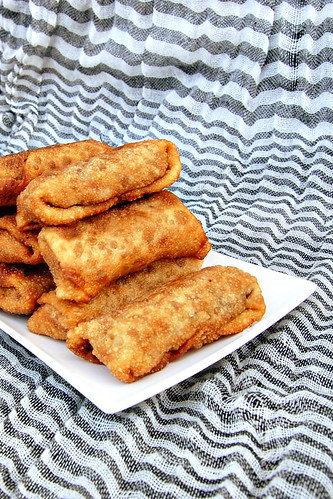
Although making the egg rolls wasn't hard, it is time consuming. I was very impressed with the wrappers. I was trying to handle them gently, but I didn't need to. They are very easy to use. You can really pinch them close without fearing that they'll tear open. Once my egg rolls were out of the oil, I stashed them in a warm oven until everyone was ready to eat, and I think that made them lose their crispiness. They were good, but chewy, (not a bad thing) and a bit oily, I found. Not sure if they are worth making at home. Seems like a call to my local take out place is much easier, neater, probably cheaper, and calls for less dishes.

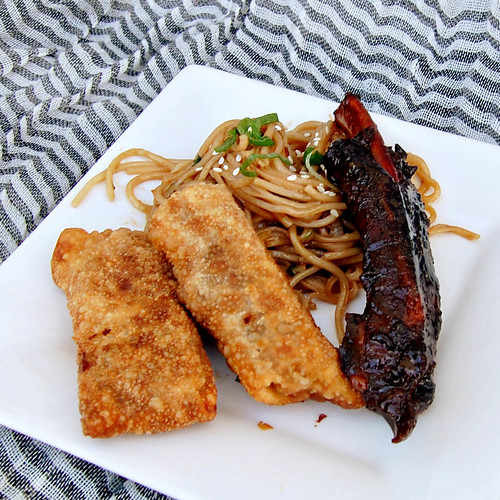
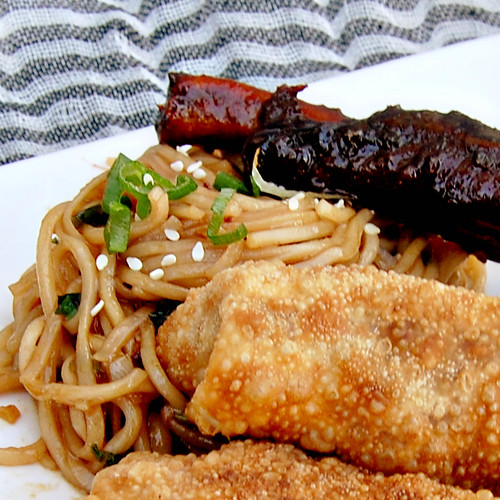
I pondered what to serve alongside the egg rolls. Not going to attempt sweet and sour chicken balls. Or General Tso. Don't like Chow Mein. My fried rice is a meal in itself, so not going to serve that. I guess I could have made Guy Ding, it would of upped the nutrition factor, but I settled on yummy scallion noodles and spareribs.


scallion noodles
recipe source : budget bytes

8 oz. (1/2 lb.) dry chinese noodles
4 cloves minced garlic
1/2 bunch green onions
4 tbsp butter
2 tsp soy sauce
1 tbsp brown sugar
1 tsp sesame oil
2 tbsp oyster sauce

In a large pot, bring water to a boil to cook the noodles according to the directions on the package (enough water to cover noodles, boil for approximately 5 minutes). Drain.

While the pasta cooks, mince the garlic and chop the green onions. Melt the butter in a large skillet over medium heat. (Or use the same pot that was used to cook the noodles. Save on the dishes!) Once the butter is melted and bubbly, add the garlic and onions and saute until they are soft but not browned.

While the garlic and onions are cooking, mix the oyster sauce, brown sugar, soy sauce and sesame oil together in a bowl.

Remove the skillet with the sauteed garlic and green onions from the heat. Add the drained pasta and oyster sauce mixture to the skillet and stir well to coat the pasta. If your pasta is stiff or sticky making it hard to stir, mix in a small amount (1/4 cup or less) of hot water to loosen them up. Top noodles with extra green onions and sesame seeds.


Making these, I realised just how unhealthy my meal was getting. But it was really good. These noodles are really simple to make and they are super addictive.

Rounding this plate up was easy peasy spareribs. Bought them already cut into single portions, put them in the slow cooker with a bottle of honey garlic sauce, cooked on high for 4 hours, until falling off the bone tender. I'm not a big fan of meat straight out of the slow cooker, so I put the meat in a frying pan, degrease the cooking liquid, and let it bubble away until thick and syrupy. Yeah, not much of a recipe, I know. My uncle makes the best spareribs. But he's not sharing the recipe. If you have a great one you're willing to share, I'd love to try it! Until then, I'll stick to bottles of sauce.

Tuesday, May 24, 2011

BURGERS AND ZUCCHINI FRIES

I like burgers with stuff in them... Breadcrumbs, eggs, onion soup mix, bbq sauce, mustard... That's how my mom used to make them, so that's how I learned to make them. I can't remember what tv chef said that burgers made with stuff other than ground beef and seasoning are not burgers, but meatloaf sandwiches. I guess that's about right. But I like meatloaf sandwiches! 


These are not meatloaf sandwiches. Definitely burgers, as my husband prefers his burger patties thin, and pure beef. I still like to impart big flavor to the patties, using my secret weapon: Clubhouse Rub Marinade. I guess that stuff is made to slather on steak, but mix in a big spoonful into ground beef, shape into patties, flip onto the grill and you have some mighty tasty burgers. Doesn't hurt that my husband is a pro at grilling burgers.

Mine featured, from the bottom up, mayo, lettuce, diced onion, tomato, pepper jack cheese, meat patty, sweet pickles, honey mustard and ketchup. It was delicious.

Alongside the burgers, I made zucchini fries that I had seen on one of the food gallery sites not too long ago. For the effort, and the lack of massive amounts of fat, these were surprisingly good. The breadcrumbs added a little crunch, the zucchini were fresh and sweet, not too mushy like they sometimes are when they are fried in batter. Doesn't hurt that I was dipping them in sriracha sauce mixed with mayo. My newest favorite dipping sauce. So good! Anyways, a nice side dish that I'll be making again... And maybe next time, I'll be able to get my daughter to eat a few pieces. 


Baked Zucchini Fries
Recipe adapted from une deux senses

3 medium zucchini, sliced into sticks
1 large egg white
salt
fresh pepper
1/3 cup bread crumbs
2 tsp garlic seasoning
2 tbsp grated Parmesan cheese
olive oil spray

Preheat the oven to 425 F. In a small bowl, beat the egg whites and season with salt and pepper. In a ziplock bag, place the breadcrumbs, seasoning and cheese; shake well. Spray a cookie sheet with olive oil and set aside. Dip the zucchini sticks into the egg and then place into the bread crumb and cheese mixture, a few at a time and shake to coat. Place the breaded zucchini in a single layer and spray more cooking spray on top. Bake for 25 minutes, or until golden brown. Serve with some pizza sauce or ranch dressing for dipping.


Yeah, I know, kind of ordinary as a first post for this new blog. I had to ease into it gently! This picture taking is going to take some getting used to. My daughter had already finished half of her burger by the time I sat down to eat mine. In any case, I thought this zucchini fries recipe was worth sharing! 

Monday, May 23, 2011

HERE WE GO AGAIN!

I started a baking blog in February 2011... just because. And turns out, I really like it. I like sharing what I make. I like writing about it, and weaving in personal anecdotes from my life. I'd say that I like taking pictures of the food I make, but I'm still too clueless about it to enjoy it. It's mostly frustrating because I don't know what I'm doing.

But what's best, is going back to the blog when I need something. I have the worse memory ever. I don't remember anything, so having the blog to remind me what I did and why I did it that way is great for me. I rely on it way more than I should.

So I thought it was too bad that I'm only blogging about baking. I'm probably a better baker than cook, but technically, I cook more than I bake. If I don't, I really should! So I decided to start another blog, this one about meals I cook for my family. My main challenge is going to be the pictures, I'm sure. I hate eating cold meals, and I'm always in a rush around meal times. My daughter's are hungry and whiny, I'm hungry and cranky... So I can just imagine how cranky i'm going to get when I have to wait to eat because I have to take a picture of my plate, and then not being able to get the "perfect" shot... Oh well, we'll see how it goes... And how many posts go up without a picture! Hey, at least you'll know why.

So come along for the ride, see how this blog goes, and how fun mealtimes are at our house!