Saturday, October 20, 2012

SPINACH DIP PASTA

We had spinach artichoke dip as an appetizer at a restaurant a little while back and we were reflecting on the fact that mixed with pasta, it would make a really good meal. Well I thought we had this conversation, but my husband had no recollection of this.

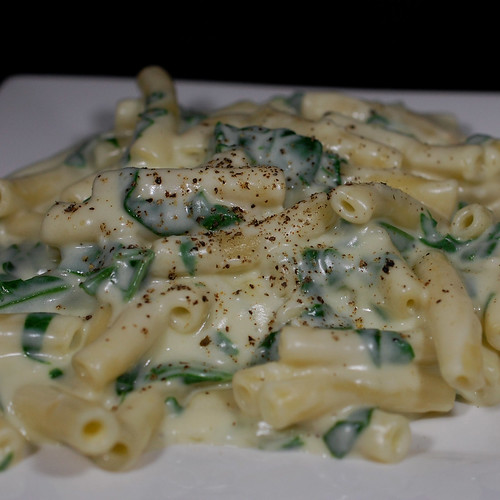
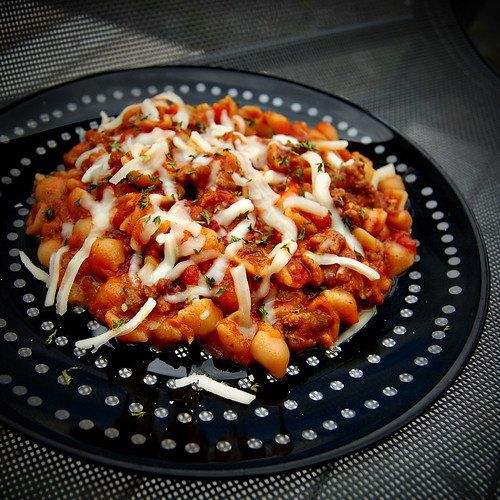
I had a bag of spinach in the fridge, so I made this for dinner tonight.


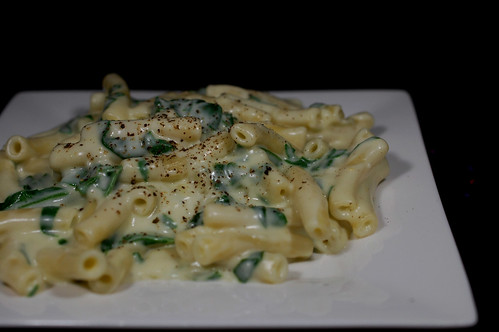
Not quite like the spinach artichoke dip we had, but it made a good pasta. I would have liked some kind of acidity in there (I desperately wanted to add ketchup to it, but refrained), and I should have salted it a bit more, but it was good.

I plan on tossing the leftovers in the oven tomorrow, see if it will bubble up and brown from all the cheese in this dish.

Spinach Dip Pasta
recipe source : fabulous foods

3 tablespoons unsalted butter
1/2 medium onion, diced
3 cloves garlic, minced
1/3 cup all-purpose flour
2 cups 2 percent milk
2 cups light cream
12 ounces macaroni noodles
22 ounces fresh spinach, chopped
1 cup shredded mozzarella
1 cup grated Champagne white cheddar cheese
1/4 cup Parmesan cheese
Dash of salt and pepper

Cook pasta according to package directions and set aside.
Melt the butter in a large saucepan over medium-high heat. Add the onions and cook until just soft, or about 2 minutes. Add in the garlic and cook another 3 minutes. Stir in the flour until a thick roux forms. Reduce the heat to medium and whisk in 2 cups of milk. Add in the remaining 2 cups of cream, whisking constantly. Increase the heat and bring the mixture to a boil, while stirring, about 8 minutes. Sauce should be pretty thick.
Season with salt and pepper. Reduce the heat to low and stir in the cheese, spinach and additional salt and pepper. Stir until the mixture is fully combined and thick. Stir in the macaroni noodles. Serve warm and enjoy!

Monday, October 8, 2012

BAKED BEANS

I like baked beans once in a while, but only my mom's recipe. I spent a whole hour looking for it this morning, thinking I would adapt it to cook in the oven for six hours instead of doing it over two days in the slow cooker. I'm not organized enough to do this over two days!

So basically, the beans get boiled for two minutes, then the rest of the ingredients get combined with the beans and they go in the oven for four hours. I guess you're supposed to add water after the four hours and bake the beans uncovered for another two hours, but I didn't add the extra water, and only baked them for another hour and they came out perfect!


We had them for dinner with homemade pretzel rolls to mop up all the good stuff! The only thing I regret is not having hot dogs to chop into the beans! Would have been so good. We might have to eat the leftover beans on top of hot dogs later this week!

Baked Beans
recipe from my mom, method adapted from Betty Crocker

2 cups dried navy beans (1 lb) sorted and rinsed
10 cups water
8 slices of bacon, sliced into thin strips
1/2 cup chopped  onions
1/2 cup molasses
1/4 cup chili sauce (heinz)
2 tsp dried mustard
2 tbsp brown sugar
1 tsp salt

Heat oven to  350 degrees F.

In an ovenproof 4-quart Dutch oven, heat beans and 10 cups water to boiling. Boil uncovered for 2 minutes. Stir in remaining ingredients.

Cover and bake 4 hours, stirring occasionally.

If too dry, add up to 3 cups water. Bake uncovered 1 to 2 hours longer, stirring occasionally, until beans are tender and desired consistency.

*And yes, I put ketchup over my baked beans, and pretty much everything else. I apologize for not getting a picture before the ketchup, but really, it doesn't look much more appetizing without the ketchup.

Thursday, October 13, 2011

CHICKEN SOUP AND DUMPLINGS


My mom makes great chicken soup, but I've never had much luck. Usually my soup tastes bland. And I have a bad habit of adding way too many noodles, and the broth kinda disappears and it becomes a pasta dish. A flavorless one at that.


So I was really surprised when I tasted this soup! It was good. A bit too salty, but still! Better than bland! And it didn't have any noodles, but dumplings. Or Grand-Pères in my family. Grand-Pères were not a common occurrence in our house growing up, so it was always special when my mom made them. I've made them a few times over the years since I've moved out, but never realized how easy they are to make until I made this soup.

Chicken Soup and Dumplings
recipe adapted from America's Test Kitchen

8 bone-in, skin-on chicken thighs, trimmed of excess fat
kosher salt and ground black pepper
2 teaspoons vegetable oil
3 small onions, chopped fine
4 medium carrots, peeled and cut into 3/4-inch pieces
3 celery ribs chopped fine
1/3 cup dry sherry
8 cups low-sodium chicken broth
1 teaspoon minced fresh thyme leaves
1/4 cup Chopped fresh parsley leaves

Dumplings
2 cups unbleached all-purpose flour (10 ounces)
1/2 teaspoon baking soda
1 teaspoon sugar
1 teaspoon kosher salt
3/4 cup buttermilk, cold
4 tablespoons (1/2 stick) unsalted butter, melted and cooled about 5 minutes
1 large egg white

1. Pat chicken thighs dry with paper towels and season with salt and pepper. Heat oil in large Dutch oven over medium-high heat until shimmering. Add chicken thighs, skin-side down, and cook until skin is crisp and well browned, 5 to 7 minutes. Using tongs, turn chicken pieces and brown on second side, 5 to 7 minutes longer; transfer to large plate. Discard all but 1 teaspoon fat from pot.

2. Add onions, carrots, and celery to now-empty pot; cook, stirring occasionally, until caramelized, 7 to 9 minutes. Stir in sherry, scraping up any browned bits. Stir in broth and thyme. Return chicken thighs, with any accumulated juices, to pot. Bring to simmer, cover, and cook until thigh meat offers no resistance when poked with tip of paring knife but still clings to bones, 45 to 55 minutes.

3. Remove pot from heat and transfer chicken to cutting board. Allow broth to settle 5 minutes, then skim fat from surface using wide spoon or ladle. When cool enough to handle, remove and discard skin from chicken. Using fingers or fork, pull meat from chicken thighs and cut into 1-inch pieces. Return meat to pot.

4. FOR THE DUMPLINGS Whisk flour, baking soda, sugar, and salt in large bowl. Combine buttermilk and melted butter in medium bowl, stirring until butter forms small clumps; whisk in egg white. Add buttermilk mixture to dry ingredients and stir with rubber spatula until just incorporated and batter pulls away from sides of bowl.

5. Return stew to simmer; stir in parsley and season with salt and pepper to taste. Using greased tablespoon portion scoop, scoop level amount of batter and drop over top of soup, spacing about ¼ inch apart. Wrap lid of Dutch oven with clean kitchen towel (keeping towel away from heat source) and cover pot. Simmer gently until dumplings have doubled in size and toothpick inserted into center comes out clean, 13 to 16 minutes. Serve immediately.

I have a feeling we'll be eating this dish a few times over the coming months! Perfect for fall and winter.

Friday, September 9, 2011

ZESTY PIZZA SAUCE


Before going back to work this week, after more than a year of maternity leave, I started freaking out about meals, and how I was going to get everything done. So I took a day out of my weekend, and made a bunch of food. Most of it didn't turn out, but this pizza sauce sure did.


It's super easy, I made it while my dough was rising, and very flavorful. It had a good consistency, and a little kick. It was my first time making homemade sauce, so I don't have much to compare it to, but it sure beats the stuff from the squeezable bottle!

Zesty Pizza Sauce
recipe adapted from Life's Ambrosia

1 (680 ml) can tomato sauce
3 tablespoons tomato paste
1 heaping tsp minced garlic
3/4 teaspoon dried basil
3/4 teaspoon fennel seed
3/4 teaspoon dried oregano
1/2 teaspoon crushed red pepper depending on the amount of spice you like
heaping 1/4 teaspoon kosher salt
1/4 teaspoon granulated sugar
1/8 teaspoon allspice
Combine all ingredients in a small sauce pan. Cook over medium heat until it starts to bubble slightly, about 5 minutes. Reduce heat and let simmer for 15-20 minutes.
Use on your favorite pizza.


We're pretty boring here, when it comes to pizza, but when you have a great crust and a flavorful sauce, you don't need much else. My husband's side had pepperoni, mushrooms, green peppers, onions and extra cheese, mine had mushrooms, green peppers, onions easy on the cheese, and the girls had a plain pepperoni and cheese portion. Love that you can customize home made pizza so easily. I stretch out my dough into a parchment lined baking sheet, spread on the sauce, add the toppings, sprinkle with cheese and bake it in a 450 oven for 20 minutes, keeping an eye on it for the last few minutes so the cheese doesn't get too brown. Super easy, everybody loves pizza, and there's usually leftovers, great hot or cold, pretty much any time of day.


    Tuesday, August 30, 2011

    CHILI MAC

    I wish I had more recipes for one skillet meals. With school starting up again, my going back to work after being on maternity leave for over a year, four mouths to feed... I'm starting to stress about weeknight dinners. After being away from my husband and kids all day, the last thing I want to do is spend an hour in the kitchen trying to keep them away from the stove while I try to figure something out for dinner. 


    I have a feeling that this meal will make be featured on the menu quite often. I've adapted from The Cooking Photographer to suit our tastes and to up the veggie content. I'm sure the original is awesome, but when pressed for time, I like to use what I have on hand.
    Chili Mac
    1 ¼ pounds ground beef
    1 onion
    2 celery stalks
    2 carrots
    1 tbsp chili powder
    1 teaspoon onion powder
    1 tbsp tex mex seasoning
    1 teaspoon salt
    3 garlic cloves, minced
    1 tablespoon brown sugar
    1 (15 ounce) can tomato sauce
    1 (14.5 ounce) can diced tomatoes
    8 ounces (2 cups) small pasta
    2 cups water
    1 1/2 cups shredded cheese
    Freshly ground pepper
    Sour cream & parsley for garnish (optional)
    Using the food processor, chop the onion, the carrots and the celery. Add the veggies and the ground beaf to a large non stick skillet and cook over medium high heat. When the meat is no longer pink, strain off the grease, and add seasonings, garlic and brown sugar. Cook over medium heat for 1 to 2 minutes until fragrant.
    Stir in tomato sauce, diced tomatoes, pasta, and 2 cups water. Stir to combine, cover and keep at a high simmer for about 14 minutes or until juices are absorbed and pasta is tender.
    Stir in cheese and season with freshly ground pepper. Taste for salt and add if needed. Garnish with sour cream and parsley if desired.
    It's quick and easy, and most importantly, everybody loves it.  

    Monday, August 22, 2011

    ROOT BEER PORK SANDWICH

    I'm always on the lookout for tasty pork recipes. It's cheap, it's lean (well, it can be) and it's tasty. A little while ago I saw a pin on Pinterest for Root Beer pulled pork, I registered mild interest, then I moved on. A couple of days ago, I remembered the bottle of Root Beer in the basement fridge, added the two pork tenderloins that were in the kitchen fridge, and went looking for that recipe again. I guess there are 3 or 4 recipes floating around, and I decided to go with the tasty kitchen recipe, just because it uses chili sauce, and I thought it would be different than the usual pop + bbq sauce recipe.


    Root Beer Pork SandwichRecipe adapted from Tasty Kitchen
    2 pork tenderloins
    ½ teaspoon salt
    ½ teaspoon pepper
    1 large onion, cut into wedges
    4 cups Root Beer, divided
    6 cloves garlic, minced
    1 cup bottled chili sauce
    Place onion wedges at the bottom of a slow cooker. Sprinkle meat with the salt and pepper. Transfer meat to the cooker. Add 1 cup root beer and garlic. Cover and cook on low heat setting for 8 to 10 hours or on high heat setting for 4 to 5 hours. 
    When the meat is ready, take it out of the slow cooker and slice thinly or shred. In a medium saucepan combine the remaining 3 cups of root beer and the chili sauce. Bring to a boil; reduce heat and add the sliced pork. Boil gently, uncovered, stirring occasionally, about 30 minutes or until pork is nicely coated and almost all the sauce is reduced.
    Serve meat in a crusty bun, or wrap in a flour tortilla. Serve with coleslaw or potato salad.
    This was a very tasty use for pork tenderloins. It was fast and easy, required few ingredients, and made a good meal. My husband compared this to spareribs, and loved the taste. Will definitely make again.

    Monday, August 15, 2011

    SWEET, TANGY AND CRUNCHY COLESLAW

    We got a perfectly round little green cabbage from the CSA last week. Thankfully, sandwiches were on the menu, and what goes better with a sandwich than coleslaw? Well maybe chips, or fries, but coleslaw is pretty good too.


    Now usually I just make a quicky coleslaw out of freshly grated coleslaw mix from farmboy (not the prepackaged regular grocery store kind, it has a weird taste), bottled creamy dessing and celery seeds. But I was craving a non creamy coleslaw.

    Found this recipe on Pinterest, and it sounded perfect. Kinda surprised that there was no oil in the recipe, as I though if you weren't having creamy coleslaw, you were having oil and vinegar coleslaw. So no oil, only pantry items, sounds good!
    Sweet, Tangy & Crunchy Coleslawrecipe adapted from Patio Daddio BBQ 
    1 small green cabbage
    3 carrots
    1/2 cup sugar
    1/4 cup distilled vinegar
    2 tbsp apple cider vinegar
    1 tbsp lemon juice
    1 tsp kosher salt
    1 tsp celery seeds
    1/4 tsp dry mustard powder
    1/4 tsp ground white pepper
    1/2 tsp granulated onion
    1/2 tsp black pepper, ground fresh 
    Shred the cabbage and the carrots in a food processor.
    Combine the rest of the ingredients in a large mixing bowl and whisk until the sugar is dissolved.
    Add the cabbage and carrots and fold to coat it all.
    Serve and enjoy!
    Although next time I'd reduce the sugar, just a bit, this coleslaw was awesome. It was sweet and tangy, with a touch of lingering heat that I love! Very flavorful and fresh. Might be my new favorite quicky recipe... I mean not much more difficult that pouring on bottled sauce. And I always have all the ingredients on hand. I just wish I new how to keep the coleslaw from turning orange from the carrots. Do you have to shred them seperatly and let them dry a bit before combining with the cabbage? Seems like too much work...