Thursday, October 13, 2011

CHICKEN SOUP AND DUMPLINGS


My mom makes great chicken soup, but I've never had much luck. Usually my soup tastes bland. And I have a bad habit of adding way too many noodles, and the broth kinda disappears and it becomes a pasta dish. A flavorless one at that.


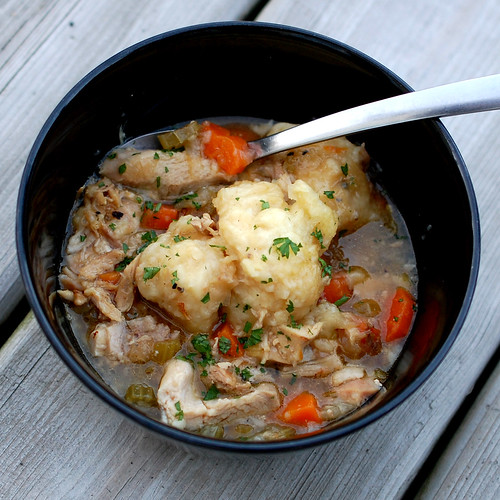
So I was really surprised when I tasted this soup! It was good. A bit too salty, but still! Better than bland! And it didn't have any noodles, but dumplings. Or Grand-Pères in my family. Grand-Pères were not a common occurrence in our house growing up, so it was always special when my mom made them. I've made them a few times over the years since I've moved out, but never realized how easy they are to make until I made this soup.

Chicken Soup and Dumplings
recipe adapted from America's Test Kitchen

8 bone-in, skin-on chicken thighs, trimmed of excess fat
kosher salt and ground black pepper
2 teaspoons vegetable oil
3 small onions, chopped fine
4 medium carrots, peeled and cut into 3/4-inch pieces
3 celery ribs chopped fine
1/3 cup dry sherry
8 cups low-sodium chicken broth
1 teaspoon minced fresh thyme leaves
1/4 cup Chopped fresh parsley leaves

Dumplings
2 cups unbleached all-purpose flour (10 ounces)
1/2 teaspoon baking soda
1 teaspoon sugar
1 teaspoon kosher salt
3/4 cup buttermilk, cold
4 tablespoons (1/2 stick) unsalted butter, melted and cooled about 5 minutes
1 large egg white

1. Pat chicken thighs dry with paper towels and season with salt and pepper. Heat oil in large Dutch oven over medium-high heat until shimmering. Add chicken thighs, skin-side down, and cook until skin is crisp and well browned, 5 to 7 minutes. Using tongs, turn chicken pieces and brown on second side, 5 to 7 minutes longer; transfer to large plate. Discard all but 1 teaspoon fat from pot.

2. Add onions, carrots, and celery to now-empty pot; cook, stirring occasionally, until caramelized, 7 to 9 minutes. Stir in sherry, scraping up any browned bits. Stir in broth and thyme. Return chicken thighs, with any accumulated juices, to pot. Bring to simmer, cover, and cook until thigh meat offers no resistance when poked with tip of paring knife but still clings to bones, 45 to 55 minutes.

3. Remove pot from heat and transfer chicken to cutting board. Allow broth to settle 5 minutes, then skim fat from surface using wide spoon or ladle. When cool enough to handle, remove and discard skin from chicken. Using fingers or fork, pull meat from chicken thighs and cut into 1-inch pieces. Return meat to pot.

4. FOR THE DUMPLINGS Whisk flour, baking soda, sugar, and salt in large bowl. Combine buttermilk and melted butter in medium bowl, stirring until butter forms small clumps; whisk in egg white. Add buttermilk mixture to dry ingredients and stir with rubber spatula until just incorporated and batter pulls away from sides of bowl.

5. Return stew to simmer; stir in parsley and season with salt and pepper to taste. Using greased tablespoon portion scoop, scoop level amount of batter and drop over top of soup, spacing about ¼ inch apart. Wrap lid of Dutch oven with clean kitchen towel (keeping towel away from heat source) and cover pot. Simmer gently until dumplings have doubled in size and toothpick inserted into center comes out clean, 13 to 16 minutes. Serve immediately.

I have a feeling we'll be eating this dish a few times over the coming months! Perfect for fall and winter.

Friday, September 9, 2011

ZESTY PIZZA SAUCE


Before going back to work this week, after more than a year of maternity leave, I started freaking out about meals, and how I was going to get everything done. So I took a day out of my weekend, and made a bunch of food. Most of it didn't turn out, but this pizza sauce sure did.


It's super easy, I made it while my dough was rising, and very flavorful. It had a good consistency, and a little kick. It was my first time making homemade sauce, so I don't have much to compare it to, but it sure beats the stuff from the squeezable bottle!

Zesty Pizza Sauce
recipe adapted from Life's Ambrosia

1 (680 ml) can tomato sauce
3 tablespoons tomato paste
1 heaping tsp minced garlic
3/4 teaspoon dried basil
3/4 teaspoon fennel seed
3/4 teaspoon dried oregano
1/2 teaspoon crushed red pepper depending on the amount of spice you like
heaping 1/4 teaspoon kosher salt
1/4 teaspoon granulated sugar
1/8 teaspoon allspice
Combine all ingredients in a small sauce pan. Cook over medium heat until it starts to bubble slightly, about 5 minutes. Reduce heat and let simmer for 15-20 minutes.
Use on your favorite pizza.


We're pretty boring here, when it comes to pizza, but when you have a great crust and a flavorful sauce, you don't need much else. My husband's side had pepperoni, mushrooms, green peppers, onions and extra cheese, mine had mushrooms, green peppers, onions easy on the cheese, and the girls had a plain pepperoni and cheese portion. Love that you can customize home made pizza so easily. I stretch out my dough into a parchment lined baking sheet, spread on the sauce, add the toppings, sprinkle with cheese and bake it in a 450 oven for 20 minutes, keeping an eye on it for the last few minutes so the cheese doesn't get too brown. Super easy, everybody loves pizza, and there's usually leftovers, great hot or cold, pretty much any time of day.


    Tuesday, August 30, 2011

    CHILI MAC

    I wish I had more recipes for one skillet meals. With school starting up again, my going back to work after being on maternity leave for over a year, four mouths to feed... I'm starting to stress about weeknight dinners. After being away from my husband and kids all day, the last thing I want to do is spend an hour in the kitchen trying to keep them away from the stove while I try to figure something out for dinner. 


    I have a feeling that this meal will make be featured on the menu quite often. I've adapted from The Cooking Photographer to suit our tastes and to up the veggie content. I'm sure the original is awesome, but when pressed for time, I like to use what I have on hand.
    Chili Mac
    1 ¼ pounds ground beef
    1 onion
    2 celery stalks
    2 carrots
    1 tbsp chili powder
    1 teaspoon onion powder
    1 tbsp tex mex seasoning
    1 teaspoon salt
    3 garlic cloves, minced
    1 tablespoon brown sugar
    1 (15 ounce) can tomato sauce
    1 (14.5 ounce) can diced tomatoes
    8 ounces (2 cups) small pasta
    2 cups water
    1 1/2 cups shredded cheese
    Freshly ground pepper
    Sour cream & parsley for garnish (optional)
    Using the food processor, chop the onion, the carrots and the celery. Add the veggies and the ground beaf to a large non stick skillet and cook over medium high heat. When the meat is no longer pink, strain off the grease, and add seasonings, garlic and brown sugar. Cook over medium heat for 1 to 2 minutes until fragrant.
    Stir in tomato sauce, diced tomatoes, pasta, and 2 cups water. Stir to combine, cover and keep at a high simmer for about 14 minutes or until juices are absorbed and pasta is tender.
    Stir in cheese and season with freshly ground pepper. Taste for salt and add if needed. Garnish with sour cream and parsley if desired.
    It's quick and easy, and most importantly, everybody loves it.  

    Monday, August 22, 2011

    ROOT BEER PORK SANDWICH

    I'm always on the lookout for tasty pork recipes. It's cheap, it's lean (well, it can be) and it's tasty. A little while ago I saw a pin on Pinterest for Root Beer pulled pork, I registered mild interest, then I moved on. A couple of days ago, I remembered the bottle of Root Beer in the basement fridge, added the two pork tenderloins that were in the kitchen fridge, and went looking for that recipe again. I guess there are 3 or 4 recipes floating around, and I decided to go with the tasty kitchen recipe, just because it uses chili sauce, and I thought it would be different than the usual pop + bbq sauce recipe.


    Root Beer Pork SandwichRecipe adapted from Tasty Kitchen
    2 pork tenderloins
    ½ teaspoon salt
    ½ teaspoon pepper
    1 large onion, cut into wedges
    4 cups Root Beer, divided
    6 cloves garlic, minced
    1 cup bottled chili sauce
    Place onion wedges at the bottom of a slow cooker. Sprinkle meat with the salt and pepper. Transfer meat to the cooker. Add 1 cup root beer and garlic. Cover and cook on low heat setting for 8 to 10 hours or on high heat setting for 4 to 5 hours. 
    When the meat is ready, take it out of the slow cooker and slice thinly or shred. In a medium saucepan combine the remaining 3 cups of root beer and the chili sauce. Bring to a boil; reduce heat and add the sliced pork. Boil gently, uncovered, stirring occasionally, about 30 minutes or until pork is nicely coated and almost all the sauce is reduced.
    Serve meat in a crusty bun, or wrap in a flour tortilla. Serve with coleslaw or potato salad.
    This was a very tasty use for pork tenderloins. It was fast and easy, required few ingredients, and made a good meal. My husband compared this to spareribs, and loved the taste. Will definitely make again.

    Monday, August 15, 2011

    SWEET, TANGY AND CRUNCHY COLESLAW

    We got a perfectly round little green cabbage from the CSA last week. Thankfully, sandwiches were on the menu, and what goes better with a sandwich than coleslaw? Well maybe chips, or fries, but coleslaw is pretty good too.


    Now usually I just make a quicky coleslaw out of freshly grated coleslaw mix from farmboy (not the prepackaged regular grocery store kind, it has a weird taste), bottled creamy dessing and celery seeds. But I was craving a non creamy coleslaw.

    Found this recipe on Pinterest, and it sounded perfect. Kinda surprised that there was no oil in the recipe, as I though if you weren't having creamy coleslaw, you were having oil and vinegar coleslaw. So no oil, only pantry items, sounds good!
    Sweet, Tangy & Crunchy Coleslawrecipe adapted from Patio Daddio BBQ 
    1 small green cabbage
    3 carrots
    1/2 cup sugar
    1/4 cup distilled vinegar
    2 tbsp apple cider vinegar
    1 tbsp lemon juice
    1 tsp kosher salt
    1 tsp celery seeds
    1/4 tsp dry mustard powder
    1/4 tsp ground white pepper
    1/2 tsp granulated onion
    1/2 tsp black pepper, ground fresh 
    Shred the cabbage and the carrots in a food processor.
    Combine the rest of the ingredients in a large mixing bowl and whisk until the sugar is dissolved.
    Add the cabbage and carrots and fold to coat it all.
    Serve and enjoy!
    Although next time I'd reduce the sugar, just a bit, this coleslaw was awesome. It was sweet and tangy, with a touch of lingering heat that I love! Very flavorful and fresh. Might be my new favorite quicky recipe... I mean not much more difficult that pouring on bottled sauce. And I always have all the ingredients on hand. I just wish I new how to keep the coleslaw from turning orange from the carrots. Do you have to shred them seperatly and let them dry a bit before combining with the cabbage? Seems like too much work...

    Wednesday, August 10, 2011

    SUMMER PASTA WITH TOMATOES AND ITALIAN SAUSAGE

    We had this dish the other night at the request of my husband. His mom used to make it for him, and when he saw that we had the same cookbook she has, he requested it. I adapted it to use some of the things I had in the fridge that would have otherwise ended up in the trash. Although it's basically the same base ingredients as my typical pasta sauce, it's very different. It comes together really quickly and since it doesn't simmer for hours, it tastes very light and fresh. A perfect pasta dish for the summer.


    Summer Pasta with Tomatoes and Italian Sausage
    recipe adapted from Lighthearted Everyday Cooking by Anne Lindsay

    1 lb hot Italian sausage
    1 lb short pasta
    1 tsp vegetable oil
    1 large onion, chopped
    1/2 green pepper, chopped
    1/2 package sliced mushrooms
    3 cloves garlic, minced
    2 tsp dried basil
    1 tsp dried oregano
    1/2 tsp black pepper
    1 can (28 oz) chopped tomatoes with their juice
    chopped fresh parsley
    grated Parmesan cheese

    Cook the Italian sausage on the BBQ. Slice thinly on an angle. Meanwhile, cook pasta until al dente. Heat the oil in a large skillet, and add the onions, green pepper, mushrooms until the onions are tender. Season with garlic, basil, oregano and black pepper. Add the diced tomatoes and bring to a boil. Toss in cooked pasta and sliced sausages. Sprinkle with fresh parsley and serve with grated Parmesan cheese.

    A quick meal, that's relatively healthy and delicious!

    Wednesday, July 6, 2011

    PAD SEE EW

    I miss eating out. I've been on maternity leave for over a year now, and I really miss going out for lunch. I work near a mall, therefore, near a food court. And no matter how many options I have, I mainly gravitate towards thai or japanese. I really miss thai food.


    Although my oldest daughter used to eat pretty much anything, she's gotten really picky. And my husband, although not picky, prefers comfort food to pretty much anything else. But once in a while, when there are enough leftovers in the fridge so that the rest of my family can still have something they like, I make something that *I* want to eat.

    We had a leftover pork tenderloin, broccoli and some greens in the fridge that needed to be eaten up. That, plus a couple of bottles of sauce and some rice noodles spelled out Pad See Ew for me! I had been using this recipe for a while, but I thought I could try a new one, see if it comes closer to the food court version that I love so much! And it was great! Saucy and salty, just spicy enough, could have been a touch sweeter, but still delish! And way less greasy than the take out version. If it wasn't for the crazy sodium content, it could almost pass as a healthy meal!

    Pad See Ew
    recipe adapted from Dorsey Kitchen

    1/2 package wide rice noodles

    some kind of leftover meat (I used leftover pork tenderloin)
    some green veggies (I used broccoli and arugula)
    4 tablespoons light soy sauce
    4 tablespoons black soy sauce, dark soy sauce, or thick soy sauce
    1/2 teaspoon ground white pepper
    1/4 teaspoon red pepper flakes, to taste
    1-2 tablespoons sugar, to taste (I used 1 heaping tbsp)

    2 tsp sesame oil
    3 cloves garlic, minced

    2 large eggs at room temperature

    Soak or cook the rice noodles according to package directions. Drain and set aside. 

    Chop your meat and vegetables. In a small bowl, combine the two soy sauces, the white pepper, red pepper flakes and sugar.

    In a wok or a big frying pan, heat the 2 tsp sesame oil and drop in the minced garlic, stirring until fragrant. Add your veggies and your meat, cooking until the veggies are to your liking. Add the cooked noodles to the pan. Pour some of the sauce over the noodles and stir until they are nicely coated. You may not need to use all of the sauce. Taste as you go. Push the noodles to one side of the pan so you have room to scramble your eggs. Crack your eggs into the pan, and stir them around until they are cooked. Stir everything together, serve, and eat!


    I got 3 big servings out of that recipe. And for the record, by husband had some and said it was almost delicious. Good enough for me!

    Sunday, July 3, 2011

    APRICOT GLAZED BBQ PORK TENDERLOIN

    Although I never make them, I love recipes for ribs and wings. I find the ribs too fatty, and wings not worth the trouble. But usually, the rubs, marinades and sauces that flavor and glaze the meat can be used for other cuts of meat, such as chicken thighs, and  in this case, pork tenderloin.

    This is my go to recipe for pork tenderloin, cut out from a Rachael Ray magazine years and years ago. Months later I bought her magazine again because of delicious looking ribs on the cover, and surprise surprise, it was the same recipe I had cut out months back. I hate when they do that! When I buy a magazine, I expect fresh content! In any case, this pork tenderloin recipe, adapted from a baby back ribs recipe is an amazingly easy recipe that yields super tender, flavorful


    Apricot Glazed  BBQ Pork Tenderloin
    recipe adapted from Adam Perry Lang via Rachael Ray

    3 tablespoons packed brown sugar
    1 tbsp sweet smoked paprika
    1 tbsp chili powder
    1 1/2 tsp salt
    1 1/2 tsp peach-flavor gelatin
    3/4 tsp Worcestershire sauce
    2 tbsp mustard

    2 pork tenderloins
    1/4 cup store-bought barbecue sauce
    2 tbsp apricot preserves

    Preheat the grill until it's nice and hot. Mix all the rub ingredients together. Trim the tenderloins and coat with the rub. In a small bowl, combine the ingredients for the apricot glaze. Remove half of the glaze to a small bowl to serve with the pork.

    Grill the pork until an instant thermometer reaches 145-150 degrees. In the last few minutes of cooking, brush the meat with the half the glaze. Remove pork from grill, and let it rest, covered with foil, for 5 minutes. Slice pork and serve with reserved apricot glaze.

    Tuesday, June 28, 2011

    CREAMY CORN, BASIL AND BACON PASTA

    Every time I make a creamy pasta, everybody rushes to the table and happily digs in. I was supposed to make this pasta with corn, bacon and basil a few weeks ago, but I didn't have any parmesan in the fridge. Then I let the bacon go bad (what a waste!). So this pasta was back on the menu this week after we were given some bacon, and miraculously, I had all the ingredients on hand. It's a very simple, but very rich dish, one of my husband's favorite.


    Corn, Bacon & Basil Spaghetti
    Adapted from Bitchin Camero

    1 lb. spaghetti

    4 slices bacon, cut into strips
    2 cup corn, kernels removed
    3/4 cup whipping cream
    1/3 cup freshly grated Parmesan cheese
    1 tsp. salt
    1 tsp. freshly ground black pepper
    1/4 cup chopped basil leaves
    black pepper and parmesan cheese to serve

    Set a large pot of water to boil and cook your pasta until almost al dente.

    Set a large skillet or wok over medium-high heat and cook the bacon until the fat renders and begins to turn golden. Remove with a slotted spatula to paper towels and set aside.

    Add the corn kernels to the skillet and cook for about 5 minutes, or until they are just tender. Remove from heat and place half of the corn in a food processor or blender. Add the cream, cheese and salt and pulse until smooth. Return the creamed corn to the pan and mix with whole kernels.

    When the pasta is almost al dente, transfer it directly from the pot into the skillet, allowing some pasta water to transfer with the noodles. Add the bacon and pepper and toss the spaghetti with the corn until evenly coated. If the sauce is too thick, add some pasta water and toss again until everything is nice and creamy.

    Sprinkle with the basil leaves and serve.

    A small serving of this goes a long way. And don't forget the black pepper. You need some heat to counter the sweetness of the corn and the creaminess of the pasta. This is a perfect dish for summer, when corn is in season, and basil is plentiful in the garden!

    Thursday, June 23, 2011

    CHICKEN SANDWICH WITH BRIE, WALNUTS AND PEACHES

    I just had the best sandwich ever! Every time I've made a variation of this, I just can't get over how amazing a sandwich can taste! It's savory, and crunchy, and creamy, and nutty, sweet and salty, with a touch of acidity... Oh you must make this now!


    chicken sandwich with brie, walnuts and peaches
    makes one sandwich

    Salt and pepper one small chicken breast, and cook it in a small skillet lightly coated with olive oil. Let cool a bit, then slice.

    Spruce up store bought mayo with a bit of garlic powder and lemon juice, until it tastes just right to you. Slice up a peach, or whatever ripe fruit that you have on hand (pears are awesome too, I've made this with plums...). Gather lettuce or some kind of greenery from the garden. Tear up some brie in smallish pieces (I've given up on trying to slice that cleanly). Get some walnuts out of the pantry, and some honey.

    Toast your choice of bread, be it a bagel, or a ciabatta, and rub it with the cut side of half a clove of garlic.

    Spread generously with mayo, and top with brie, walnuts, fruit, chicken, honey and lettuce...

    ... and enjoy.

    The only thing I regret is the bread. An ordinary bagel is so not worthy of this sandwich. It's just not good enough. A nice ciabatta would have been perfect, but I wasn't planning on making this sandwich. I was cooking some chicken breasts to feed the baby, and realized that I had all the components on hand to make this happen. So the bagel was just going to have to do! And it did. But next time... ciabatta!

    Monday, June 20, 2011

    POTATO SALAD

    Father's day is not something we heavily celebrated growing up, as my dad is not the celebrated type. He doesn't like his birthday either, and usually escapes to the cottage, as is the case this year. My husband also doesn't get the concept, so, after a very healthy breakfast of buttermilk donuts, in lieu of a father's day cake for my husband and father of my two beautiful daughters, we celebrated the dads in his family with a BBQ at my in-laws.

    I was in charge of the potato salad. Unfortunately, I'm very, very picky about "traditional" potato salad. The only one I like comes from Walmart and is full of MSG and other heavily processed, nasty things. So whenever I make potato salad, I make this non traditional, yet, super yummy, creamy grilled potato and mushroom salad.


    I'm not very good at making potatoes, but for this salad, I always grab a bag of pre washed teeny tiny yellow fleshed potatoes. For this recipe, they are boiled until tender, then tossed with mushrooms, oil, barbeque sauce, salt and pepper. From there, you can grill it on the bbq, but I usually just toss the potatoes and mushrooms in a pan and let the mushrooms cook, and the potatoes get golden. Once that's cool, you add a chopped red pepper, 3 green onions and 3 cups baby spinach, and toss the whole thing with a mixture of mayo, bbq sauce and chopped parsley.

    Creamy Grilled Potato and Mushroom Salad
    recipe source: Diana Sauce

    2 lb baby potatoes, halved
    1 lb button mushrooms, trimmed
    1/2 cup Diana® Sauce, Original flavour
    2 tbsp vegetable oil
    1/2 tsp each salt and pepper
    1/2 cup light mayonnaise
    2 tbsp chopped fresh coriander or parsley
    1 red pepper, chopped
    3 green onions, chopped
    3 cups baby spinach leaves

    Cook the potatoes in a large pot of boiling salted water for 10 minutes or until just fork tender. Drain and rinse under cold, running water. Transfer to a large bowl. Add the mushrooms.
    Preheat the grill to medium-high. Stir 2 tbsp (30 mL) of the sauce with the vegetable oil. Gently toss the potatoes and mushrooms with the oil mixture, salt and pepper. Transfer to a grilling basket or line the grate with perforated grilling foil. Grill for 20 minutes, turning often until well marked. Cool to room temperature.
    Stir the remaining sauce with the mayonnaise and coriander. Toss the potatoes, mushrooms, red pepper, onions and spinach with the mayonnaise mixture. Serve at room temperature or cool.


    I love this salad because it's no fuss. It doesn't wilt and turn to mush easily. You can serve it warm, cold or a room temperature. It's really a perfect side for any BBQ. I always have leftover sauce, so I leave it out so people who want a creamier salad can help themselves. It's also awesome as a dipping sauce for grilled meat. I mean it's mayo and bbq sauce. How can you go wrong?!

    Friday, June 3, 2011

    GNOCCHI POUTINE WITH SHORT RIB RAGU

    Now I realize that this isn't the most attractive looking dish. I mean it's poutine, not meant to be pretty. But this guy sure did make it delicious looking. When I saw this picture on one of the food galleries, and then read the caption, my jaw dropped. Must. Make. That. Now. But, I was a good girl and waited until the short rib was on special. A buck off regular price isn't that big of a deal I guess, but still.


    In any case, this recipe is a direct knockoff of his recipe, with really minor changes. It's so good, we had it two nights in a row. Usually, I try to re-invent leftovers, but I needed to have this dish again in it's original form.

    It a short rib ragu, basically a beef stew, cooked in the oven for three hours. The beef is then shredded, and the sauce puréed in the blender to get more of a gravy consistency. Then the beef is added back into the sauce and kept hot until the gnocchi is cooked.

    I know what goes on poutine is really a matter of personal preference. I like it with shredded cheese, for that melty stringy factor, and with curds, for that squeaky salty goodness. So I topped the cooked gnocchi with a mix of shredded cheese meant for pizza. Then, I topped that with saucy beef, then added curds. Room temperature, made-that-morning-20-minutes-away-from-my-house curds. Very important. Then added big chunks of beef on top.

    Kevin, the guy behind this recipe added gremolata to the top of the dish. Usually, I would have decided that it was only needed to pretty up the dish, and wouldn't have made it, but I just got a new microplane zester thing, and I wanted to try it out. Plus I had parsley in the fridge, so might as well use it. So I was really surprised that when I brought that first bite to my mouth, the gremolata did really wonderful things to brighten the dish up. So I'm glad I tried it. And next time it's added on a dish, I might not dismiss it so quickly!

    Braised Short Rib Ragu
    recipe slightly adapted from closet cooking

    1/2 ounce dried porcini mushrooms
    1 tablespoon olive oil
    3 pounds short ribs, 2-3 inches long
    2 cups onion, diced
    1 cup celery, diced
    1 cup carrots, diced
    4 cloves garlic, chopped
    1 tablespoon anchovy paste
    1 cup grape/cranberry juice
    1 cup crushed tomatoes
    2 tablespoons tomato paste
    1 tablespoon Dijon mustard
    1 teaspoon Worcestershire sauce
    1 teaspoon dried oregano
    1 tablespoon thyme, chopped
    1 tablespoon rosemary, chopped
    2 bay leaves
    salt and pepper
    3 cups beef stock (more to thin the sauce, if needed)

    Soak the mushrooms in 1/2 cup boiling water.
    Meanwhile, heat the oil in a pan over medium-high heat.
    Sear the short ribs until brown on all sides and set aside.
    Drain all but 2 tablespoons of the oil and fat from the pan and reduce to medium heat.
    Add the onions, celery and carrots and saute until tender, about 10-15 minutes.
    Add the garlic and anchovy paste and saute until fragrant, about a minute.
    Add the fruit juice and deglaze the pan.
    Add the ribs, the mushrooms and their liquid, crushed tomatoes, tomato paste, Dijon mustard, Worcestershire sauce, oregano, thyme, rosemary, bay leaves, salt and pepper and enough beef stock to cover the ribs.
    Bring to a boil, cover, and transfer to a preheated 350F oven and cook until the meet is falling off the bones, about 3 hours.
    Remove the beef from the pan, set aside to cool
    Spoon off as much fat from the top of the sauce as possible. Puree the sauce in a blender.
    Pull the beef from the bones, shred it, return it to the sauce and simmer to thicken if desired.

    Gremolata
    recipe slightly adapted from closet cooking

    Combine 1/4 cup chopped parsley, the zest of 1/2 a lemon and one grated clove of garlic.

    Tuesday, May 31, 2011

    CHICKEN BURGER WITH A DRIZZLE OF HONEY

    This was supposed to be the best chicken burger ever! Homemade bun, crisp lettuce, fresh tomato, red onion, fiery pepper jack cheese, mayo... and then I ruined the chicken. Well not totally ruined, but it was over cooked. Why? Because I'm lazy, and I didn't pound it thin like the recipe instructed me to.


    But I still want to share the recipe for the chicken, because, when properly made, it's awesome. So juicy, flavorful, and then you top it with a drizzle of honey, that, with all the other flavors going on, just make that burger oh so special.

    I don't fry often, especially with my kids around, because I'm so scared of what can happen, so it's even more frustrating that one of the few times that I do fry something, I ruin it. I mean, it wasn't totally ruined, we ate it and it was okay, but we all knew how good it could have been. At least the bun made up for the chicken fail. This homemade burger bun is to-die-for. Check out my baking blog for the recipe. Even the asparagus was perfectly cooked! Love asparagus this time of year.

    honey kissed fried chicken sandwich
    recipe adapted from life's ambrosia

    4 boneless, skinless chicken breasts, rinsed and pat dry
    3/4 cup buttermilk
    1 egg
    1 tablespoon plus 1 1/4 teaspoon seasoning salt
    1/2 teaspoon Tabasco
    1 cup all-purpose flour
    1/2 teaspoon baking powder
    oil for frying
    4 homemade buns
    mayonnaise
    honey
    tomato slices
    lettuce leaves
    sliced red onion

    Place chicken breasts in a resealable plastic bag. Pound with the flat side of meat mallet until flattened to 1/4 inch thick (a rolling pin would work too).
    In a bowl whisk together buttermilk, egg, 1 1/4 teaspoon seasoning salt and Tabasco. Transfer to resealable plastic bag, and add chicken. Shake bag to that the chicken is fully coated with the marinade. Remove all the air from the bag, seal and refrigerate for at least 2 hours.
    After marinating the chicken, place flour, baking powder and 1 tablespoon of seasoning salt in a resealable plastic bag. Remove chicken from marinade and transfer to flour. Shake to coat. Allow to sit for 15 minutes.

    Heat 1/ 2 inch of oil in a skillet over medium heat. Once the oil starts to shimmer, sprinkle a little flour over it. If it sizzles its ready. Fry chicken until golden brown and cooked through, about 3-4 minutes per side. Transfer to a paper towel lined plate and set aside.

    Split buns. Spread mayonnaise on buns. Place chicken breast on bottom half of roll, drizzle 1 teaspoon of honey over each chicken breast. Add tomato, lettuce, onion and top half of roll.


    Do not, I mean DO NOT leave out the honey. I swear, it takes this burger to a whole other place! So yummy!

    Monday, May 30, 2011

    SUN DRIED TOMATO CARBONARA WAFFLE PIZZA

    I was reading this post where the blogger has a feature called magazine mondays, where on mondays, she rounds up recipes that her readers have submitted that came from magazines. I thought this was a brilliant idea, as I get a few food magazines, but rarely make anything out of them. So I picked up one of the food magazines lying around, found a few pages that I had dog-eared, and promptly forgotten about, and decided I was going to put these magazines to good use and make these recipes.


    So I did. Well not really, since the recipe I made was inspired by a picture in a magazine, but wasn't featured in a magazine. Anyways! I saw this picture of a "pizza" with a savory waffle as the crust instead of regular dough. I'm always looking for any excuse to use my waffle maker, so decided this would be lunch. My waffle maker came with a booklet of yummy sounding recipes, so I decided to use the sun dried tomato carbonara waffle as a base for our lunch.

    sun-dried tomato carbonara waffle pizza
    recipe adapted from Kitchen Aid waffle baker instructions and recipe

    2 cups all purpose flour
    2/3 shredded parmesan cheese
    2 tsp sugar
    1 tbsp baking powder
    1 tbsp basil
    1 tsp garlic seasoning
    1/4 tsp salt
    1/4 tsp black pepper

    1 2/3 cups milk
    2 eggs
    1/3 cup olive oil

    handful of chopped, cooked bacon
    2 tsp sundried tomato pesto

    Combine dry ingredients together in a large bowl and set aside. Whisk wet ingredients in a small bowl, and pour into the the dry ingredients. Mix until just moistened. Stir the bacon and sun-dried tomatoes.

    Scoop 1 cup of the mixture onto the preheated waffle iron, and cook for 3 minutes 45 seconds.


    I topped our waffles with bottled pizza sauce, chopped up pepperoni and pizza blend shredded cheese before popping it in the toaster oven to melt the cheese. I had a bunch of veggies out to add to this pizza, but this was a particularly hectic lunch, so they were quickly forgotten and only toppings requiring minimal prep were used. Good enough. I guess a nice salad would have rounded out this lunch. Next time!

    We're really starting to enjoy savory waffles around here. They are quick and easy to make, usually requiring ingredients that I have on hand, and they are super tasty!

    Saturday, May 28, 2011

    FOUGASSE AND ROASTED GARLIC, BACON AND ONION RELISH

    A little while back, I made bacon jam. Highly enjoyable when freshly made, very bad for you, awesome on fresh bread. So when I saw this recipe for roasted garlic, bacon and onion marmalade floating around, I decided to see how it compared. It has similar components: bacon, onions, garlic, vinegar, but the focus on this one, is definitely more on the garlic and onions than on the bacon, although the bacon does add a nice salty smoky flavor.


    The only thing is, I refuse to call it marmalade. It just doesn't provide the right picture in my head. Debating between jam and relish.... going for... relish.

    Roasted Garlic, Bacon and Onion Relish
    recipe source: hungry foodies pharmacy

    2 heads of garlic
    3 slices bacon
    1 tablespoon extra virgin olive oil
    3 large yellow onions, sliced
    1/3 cup water
    2 tablespoons balsamic vinegar
    1 heaping tablespoon brown sugar
    1 tablespoon thyme, chopped
    Salt and pepper, to taste

    Preheat oven to 400 degrees F.

    Cut off 1/4 to 1/2 inch of the top of the garlic bulbs using a knife, leaving the tops of the individual garlic cloves exposed. Place garlic bulb on top of a sheet of aluminum foil large enough to wrap the whole garlic bulb. Drizzle with two teaspoons of olive oil, sprinkle with a little salt, and wrap foil tightly. Bake for about 30-35 minutes, or until the feel soft when pressed.

    Allow the garlic to cool enough so you can touch it without burning yourself. Use a fork or your fingers to pull or squeeze the roasted garlic cloves out of their skins. For large roasted garlic cloves, chop coarsely.

    In a large, nonstick skillet, heat extra virgin olive oil over medium heat. Add the bacon slices and cook until the fat has been rendered, and the bacon is crispy. Remove bacon and place onto a paper towel-lined plate. Once cool to handle, crumble the bacon into coarse crumbles.

    In the same skillet with the bacon fat, add the onions and saute until the onions are tender, about 15 minutes. Reduce the heat to just medium to medium-low, add water, cover with a lid and cook until the onions turn an amber golden brown. You will need to stir occasionally, until done, about 45 minutes.

    Add the crumbled bacon, balsamic vinegar, brown sugar, thyme, roasted garlic cloves, salt and pepper, and deglaze the pan and cook until most of the moisture is gone. Once cooled, pour into a container and keep refrigerated. Will keep for about 5 days.

    Makes 1 1/2 cups.


    It's a savory spread for sure, with a hit of sweet. Good flavor. The only thing about it, you kinda have to serve it fresh, because if it sits, even at room temperature, it kinda congeals, and looks unappetizing. (Not that it's a beautiful condiment to start with...) I mean, it's made with bacon. That's what bacon fat does, right? Serve it fresh. If you make it ahead of time, try reheating it before serving it. 

    To eat with this relish, I really wanted to make these cheesy potato sticks, but I just couldn't find the flour called for in the recipe. I was going to try to find another recipe for potato bread sticks, but when I picked up an issue of Ricardo so I could read it before giving it back to my mom, I saw the fougasse and knew that it was going to be a winner. I say read, but I really didn't. Ricardo is a nice magazine and all, but the articles are super specific and super long. I mean, six pages devoted to radishes? Really? So I skimmed it. And the fougasse! 


    It's basically just pizza dough, shaped like, well, a fougasse, and topped with aromatics and oil.

    Fougasse
    recipe adapted from Ricardo

    1 1/4 cups warm water
    1 tbsp olive oil
    1 tbsp honey
    2 3/4 cups all purpose unbleached flour
    2 tsp instant yeast
    1/2 tsp salt

    3 tbsp olive oil
    2 tsp fresh thyme
    freshly cracked black pepper
    fleur de sel

    In a glass measuring cup, combine the water, oil and honey. Set aside. In the bowl of a stand mixer, combine the flour, yeast and salt. Add the wet ingredients and using the bread hook, mix until the dough comes together. Let the stand mixer do its thing for 3 minutes.

    Shape the dough into a ball, and put it in a clean, lightly oiled bowl covered with a damp tea towel to let rise in a warm spot  for about 1 hour, until doubled in size.

    In a small bowl, mix the oil with the herbs and season with salt and pepper.

    If you have a pizza stone, set it on the lowest rack of your oven. Heat the oven to 475.

    When the dough had double, divide it in two portions and stretch it into a rough circle on a piece of parchment. Using kitchen shears, cut 6 holes in the dough and stretch it out slightly. Brush the dough with oil and sprinkle with fleur de sel. Bake for 15 minutes until golden.


    This was wonderful bread! I'm used to making the no knead artisan bread in 5 minutes a day bread, but this isn't much more work, and I like that you can use it after only an hour. It was fluffy, and chewy in a good way, and very flavorful. 

    I was a bit worried because the dough seemed really wet, but I let it rise anyway. I only had 3/4 tsp instant/quick yeast, so I used traditional yeast as well without ill effects. It rose up fine, and was easy to shape. Fougasse is pretty forgiving anyway. It's meant to look rustic.

    Oh and the original recipe calls for rosemary instead of thyme and a minced garlic clove in the oil. I guess any combination can work! 

    My husband declared that this was the best pizza dough yet, and that he expects pizza more often since the dough is so easy to make. Guess I'll have to oblige!

    Wednesday, May 25, 2011

    EGG ROLLS, SCALLION NOODLES AND SPARERIBS

    A couple of egg roll pictures floating on the web caught my eye recently, and I knew I just had to make some. Our local chinese take out makes a pretty mean egg roll, but nothing like these pictures I saw. They looked so much... healthier. I know egg rolls aren't healthy, but hey, they're stuffed with veggies. It's all good!

    I combined the recipe from annie's eats and the one from a sweet chef, used what I had in the fridge, and came up with this:


    egg rolls

    1 lb. boneless, skinless chicken thighs, cut into strips
    2 tbsp soy sauce
    2 cloves minced garlic
    1 tsp black pepper
    1/2 tsp chopped ginger
    4 tbsp. vegetable oil, divided

    ¾ head green cabbage, shredded thin
    1 small onion
    3 carrots, peeled and shredded
    3 stalks celery
    3/4 cup frozen peas
    4 chopped green onions
    1 tbsp soy sauce
    1 tbsp dark soy sauce
    2 tsp sweet soy sauce

    24-30 egg roll wrappers
    1 egg
    Canola or peanut oil, for frying

    In a resealable plastic bag, combine chicken, soy sauce, garlic, black pepper and ginger. Press out the air, seal, and let marinate in the fridge for 30 minutes, up to 3 hours.

    Add 2 tbsp oil to a large skillet or wok and cook chicken over medium-high heat until cooked through. Remove from pan and set aside. When cool enough to handle, chop chicken in small pieces.

    If needed, add more oil to the pan, and cook cabbage, onion, carrot and peas until tender, about 5-8 minutes. Add green onion, soy sauce and stir to incorporate. Cook 2 minutes. Add the cooked chicken and stir again to incorporate well. Cook an additional 5 minutes. Place the mixture in a colander, pressing down to remove as much liquid as possible. Let cool for 30 minutes before assembling egg rolls.

    On a clean, flat surface, place 1 egg roll wrapper with 1 corner facing you. Place approximately 1-2 tablespoons of the filling about 1 inches from the bottom corner of the wrapper. Fold the bottom corner over the filling.

    Firmly roll the filled wrapper half-way up the rest of the wrapper. Dab the exposed edges of the wrapper with a beaten egg. Fold the two sides over the filled roll and roll the rest of the way up, pressing the top corner firmly onto the egg roll to seal it.

    Repeat for the rest of the wrappers. Once ready to cook, heat about 3/4-inch to 1-inch of vegetable or canola oil over medium-high heat in a large skillet or wok. Once oil is hot (you will know it’s ready when you dip the end of a wooden spoon in it and bubbles form around it right away), carefully place enough egg rolls to cover the bottom of the pan. Try not to crowd them. Fry until golden brown on both sides, about 1-2 minutes per side. Once golden brown on both sides, remove and drain on a plate lined with paper towel.


    Although making the egg rolls wasn't hard, it is time consuming. I was very impressed with the wrappers. I was trying to handle them gently, but I didn't need to. They are very easy to use. You can really pinch them close without fearing that they'll tear open. Once my egg rolls were out of the oil, I stashed them in a warm oven until everyone was ready to eat, and I think that made them lose their crispiness. They were good, but chewy, (not a bad thing) and a bit oily, I found. Not sure if they are worth making at home. Seems like a call to my local take out place is much easier, neater, probably cheaper, and calls for less dishes.

    I pondered what to serve alongside the egg rolls. Not going to attempt sweet and sour chicken balls. Or General Tso. Don't like Chow Mein. My fried rice is a meal in itself, so not going to serve that. I guess I could have made Guy Ding, it would of upped the nutrition factor, but I settled on yummy scallion noodles and spareribs.


    scallion noodles
    recipe source : budget bytes

    8 oz. (1/2 lb.) dry chinese noodles
    4 cloves minced garlic
    1/2 bunch green onions
    4 tbsp butter
    2 tsp soy sauce
    1 tbsp brown sugar
    1 tsp sesame oil
    2 tbsp oyster sauce

    In a large pot, bring water to a boil to cook the noodles according to the directions on the package (enough water to cover noodles, boil for approximately 5 minutes). Drain.

    While the pasta cooks, mince the garlic and chop the green onions. Melt the butter in a large skillet over medium heat. (Or use the same pot that was used to cook the noodles. Save on the dishes!) Once the butter is melted and bubbly, add the garlic and onions and saute until they are soft but not browned.

    While the garlic and onions are cooking, mix the oyster sauce, brown sugar, soy sauce and sesame oil together in a bowl.

    Remove the skillet with the sauteed garlic and green onions from the heat. Add the drained pasta and oyster sauce mixture to the skillet and stir well to coat the pasta. If your pasta is stiff or sticky making it hard to stir, mix in a small amount (1/4 cup or less) of hot water to loosen them up. Top noodles with extra green onions and sesame seeds.


    Making these, I realised just how unhealthy my meal was getting. But it was really good. These noodles are really simple to make and they are super addictive.

    Rounding this plate up was easy peasy spareribs. Bought them already cut into single portions, put them in the slow cooker with a bottle of honey garlic sauce, cooked on high for 4 hours, until falling off the bone tender. I'm not a big fan of meat straight out of the slow cooker, so I put the meat in a frying pan, degrease the cooking liquid, and let it bubble away until thick and syrupy. Yeah, not much of a recipe, I know. My uncle makes the best spareribs. But he's not sharing the recipe. If you have a great one you're willing to share, I'd love to try it! Until then, I'll stick to bottles of sauce.

    Tuesday, May 24, 2011

    BURGERS AND ZUCCHINI FRIES

    I like burgers with stuff in them... Breadcrumbs, eggs, onion soup mix, bbq sauce, mustard... That's how my mom used to make them, so that's how I learned to make them. I can't remember what tv chef said that burgers made with stuff other than ground beef and seasoning are not burgers, but meatloaf sandwiches. I guess that's about right. But I like meatloaf sandwiches! 


    These are not meatloaf sandwiches. Definitely burgers, as my husband prefers his burger patties thin, and pure beef. I still like to impart big flavor to the patties, using my secret weapon: Clubhouse Rub Marinade. I guess that stuff is made to slather on steak, but mix in a big spoonful into ground beef, shape into patties, flip onto the grill and you have some mighty tasty burgers. Doesn't hurt that my husband is a pro at grilling burgers.

    Mine featured, from the bottom up, mayo, lettuce, diced onion, tomato, pepper jack cheese, meat patty, sweet pickles, honey mustard and ketchup. It was delicious.

    Alongside the burgers, I made zucchini fries that I had seen on one of the food gallery sites not too long ago. For the effort, and the lack of massive amounts of fat, these were surprisingly good. The breadcrumbs added a little crunch, the zucchini were fresh and sweet, not too mushy like they sometimes are when they are fried in batter. Doesn't hurt that I was dipping them in sriracha sauce mixed with mayo. My newest favorite dipping sauce. So good! Anyways, a nice side dish that I'll be making again... And maybe next time, I'll be able to get my daughter to eat a few pieces. 


    Baked Zucchini Fries
    Recipe adapted from une deux senses

    3 medium zucchini, sliced into sticks
    1 large egg white
    salt
    fresh pepper
    1/3 cup bread crumbs
    2 tsp garlic seasoning
    2 tbsp grated Parmesan cheese
    olive oil spray

    Preheat the oven to 425 F. In a small bowl, beat the egg whites and season with salt and pepper. In a ziplock bag, place the breadcrumbs, seasoning and cheese; shake well. Spray a cookie sheet with olive oil and set aside. Dip the zucchini sticks into the egg and then place into the bread crumb and cheese mixture, a few at a time and shake to coat. Place the breaded zucchini in a single layer and spray more cooking spray on top. Bake for 25 minutes, or until golden brown. Serve with some pizza sauce or ranch dressing for dipping.


    Yeah, I know, kind of ordinary as a first post for this new blog. I had to ease into it gently! This picture taking is going to take some getting used to. My daughter had already finished half of her burger by the time I sat down to eat mine. In any case, I thought this zucchini fries recipe was worth sharing! 

    Monday, May 23, 2011

    HERE WE GO AGAIN!

    I started a baking blog in February 2011... just because. And turns out, I really like it. I like sharing what I make. I like writing about it, and weaving in personal anecdotes from my life. I'd say that I like taking pictures of the food I make, but I'm still too clueless about it to enjoy it. It's mostly frustrating because I don't know what I'm doing.

    But what's best, is going back to the blog when I need something. I have the worse memory ever. I don't remember anything, so having the blog to remind me what I did and why I did it that way is great for me. I rely on it way more than I should.

    So I thought it was too bad that I'm only blogging about baking. I'm probably a better baker than cook, but technically, I cook more than I bake. If I don't, I really should! So I decided to start another blog, this one about meals I cook for my family. My main challenge is going to be the pictures, I'm sure. I hate eating cold meals, and I'm always in a rush around meal times. My daughter's are hungry and whiny, I'm hungry and cranky... So I can just imagine how cranky i'm going to get when I have to wait to eat because I have to take a picture of my plate, and then not being able to get the "perfect" shot... Oh well, we'll see how it goes... And how many posts go up without a picture! Hey, at least you'll know why.

    So come along for the ride, see how this blog goes, and how fun mealtimes are at our house!